Please use this step by step guide for Server deployment of Anakage –
Download all the stuff you will need –
- The latest java versions both 32/64 bit from http://www.oracle.com
- The latest MSSQL Express from https://www.microsoft.com/en-in/sql-server/sql-server-downloads.
- Latest MSSQL management studio from https://docs.microsoft.com/en-us/sql/ssms/download-sql-server-management-studio-ssms?view=sql-server-2017.
- Latest apache tomcat from https://tomcat.apache.org/download-90.cgi. From this link download the Windows Service Installer file.
Ready the machine –
- Read our documentation to get details of server prerequisites
- Create separate Drive in the server, if it doesn’t exist already (like I am using E: Drive). Allocate about 100 GB space to it.
- In Drive create a folder by the name – for example “AnyName”
- Copy paste all the downloaded files in this folder so you can easily find your all files at one location. (like I am using E:\AnyName)
Install needed components –
Java –
First, install Java 32 bit, no customization is required. Then install Java 64 bit in the same way. Java will get installed in C Drive.
Tomcat –
- Double click the Tomcat installer exe to start the installation. During configuration box – change Http/1.1 Connector Port value from 8080 to 80.
- During installation location dialog – change its value to “E:\AnyName\Apache Software Foundation\Tomcat x” (x is the version being installed).
- In the final dialog make sure Start tomcat is checked.
- Post this Tomcat will get installed in E:\AnyName\ Apache Software Foundation folder.
- Now tomcat should be running, verify open web browser and type localhost. Tomcat default page will open up. Also to check the network connectivity, open a web browser in some local system i-e, not in the server, and type the IP address of the server. The same default tomcat page should open up. If it is not the port 80 is blocked on the server and needs to enabled.
- If everything is working, open tomcat monitor from the start menu. Click on a stop to stop tomcat for now.
MSSQL –
- Double click the MSSQL exe file downloaded earlier. This installer needs internet access on the server. For reference https://www.youtube.com/watch?v=uOpgvtHfYjY MSSQL installation video.
- Select Custom installation and proceed with the installation.
- Select first option New SQL Server standalone installation
- Proceed with the installation. In the feature, section dialog unchecks SQL Server Replication, Machine learning services, R, Python, Full-Text and Semantic Extractions. It Should look as in the image below.

- In the Server Configuration Dialog, set SQL Server Browser Startup Type to be Automatic as shown in the image.

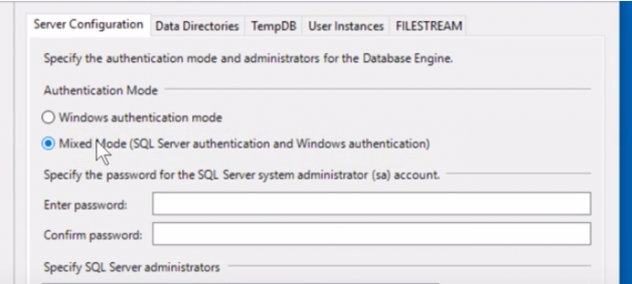
- Next, in the database engine configuration dialog, change to mixed mode and set the password as “your password”. Refer image.

- After the installation is complete, download MSSQL Management studio from https://docs.microsoft.com/en-us/sql/ssms/download-sql-server-management-studio-ssms?view=sql-server-2017 . Install it.
- Post this open management studio from the start menu. A dialog as shown in image will open up.

- Authentication method should be as shown, enter login as “sa” and password
as “your password” and click connect. - After it is connected, Create a new database. Name it as “Your Database Name”.
Code Deployment –
- Rename your “FileName.war” file to ROOT.war.
- Go to “E:\AnyName \Apache Software Foundation\Tomcat x\Webapps” folder. Delete everything inside this folder. (Make tomcat is not running from tomcat monitor before doing this step).
- Copy Paste ROOT.war in “E:\AnyName\Apache Software Foundation\Tomcat x\Webapps”.
- Open tomcat monitor and click start. After about 5 minutes web portal should be up and running. To verify, open web browser in the server and open localhost.
Read More:


0 Comments