Have a Question?
Solution Management (Create, Edit, Delete..)
Create solution
1 – Login to Self-Help dashboard using super admin credentials.

On successful login admins will be redirected to home page of Self-Help portal which will show “Dashboard” button.
2 – Click on “Dashboard” button to access Admin section.

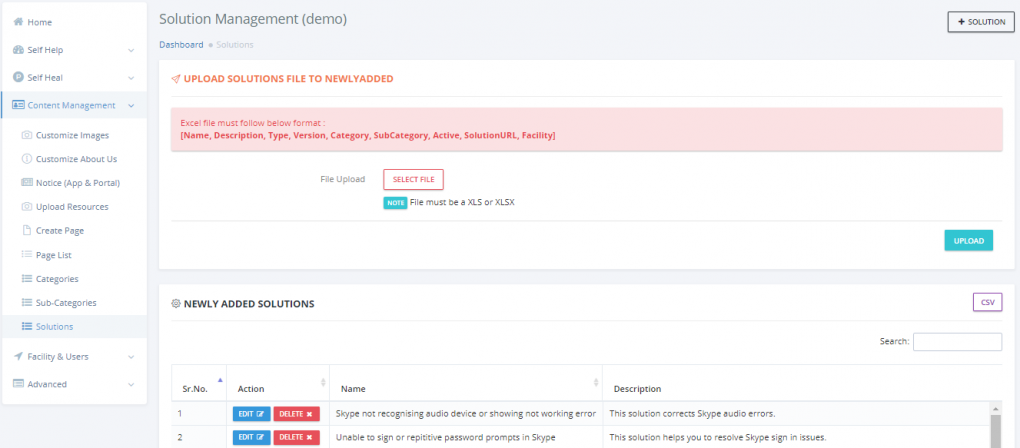
3 – Click on “Content Management” tab and then select “Solutions”.
4 – For creating new solution click on “+SOLUTION” button at top right corner.
5 – “CREATE SOLUTION” form window will open. Enter the relevant information about your solution and click on “SAVE” button.

Name – Title of solution shown in Self-Help portal and all reports.
Description – Description of solution to be shown in Self-Help portal solution blocks.
Solution Type – It could be of below types –
A – Anakage Solution (exe) – Anakage cobots which perform predefined task to fix user issues.
B – Microsoft Word (doc) – The solution block when clicked will download word document.
C – Adobe PDF (pdf)
D – Web Page (http://) – The solution block when clicked will redirect users to the Webpage
E – Anakage Self Help Pages – The solution block when clicked will redirect users to Self-Help articles/pages created from Anakage Content Management.
F – Searchable Links Only – These links will appear when user searches for specified keywords. There will be no solution blocks.
File – You can upload your EXE/DOC/PDF file here.
URL – You can define your “Web page(http://)” OR “Searchable Links Only” here.
Title – You can select your “Self Help Pages” here.
Solution Number – The unique solution number when you want to create solution for solution type “Anakage Solution (exe)”. This should be same as the number at the end of exe techselfsupportxxx.exe. In this case xxx should be entered.
Category – The category under which solution should be listed

Sub-Category – The sub-category under which solution should be listed

Search Keywords – Define search keywords for your solution. This keyword gives solution result when user search for them.
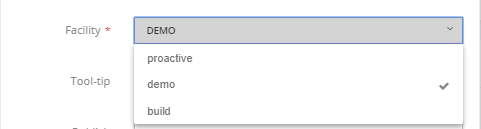
Facility – If you are super admin for multiple facility you will see multiple items. Select the appropriate facility for which you are creating solution. If you are seeing only one in this list then keep it selected.
Tool-tip – Tool tip to be shown to users when mouse over on solution block.
Publish – Yes/No – Select Yes if you want to publish or make it live now. Select No if you want to create solution but do not want to show it to users now.
Save – Once done click on Save button to save the solution. If you have selected “Yes” in Publish field then solution will be shown in Self-Help portal for users.
If information provided is correct the solution will be created and displayed in “NEWLY ADDED SOLUTION LIST”.

Update solution
1 – Select the solution that is to be updated.

2 – Click on “EDIT” button. The details will be shown in update solution form.

3 – Make the changes and click on “UPDATE”.
Delete solution
1 – Select the solution that is to be deleted.
2 – Click on “DELETE” button.

Note – When a solution is deleted all its analytics data is deleted. If solution is shared by multiple facilities do it carefully. You can also consider unpublishing the solution instead of deleting it in next section.
3 – The solution will be deleted.
Publish/Unpublish the solution
The solution can be kept in this section but will only be shown to users if it is published.
1 – Select the solution whose publish state is to be changed
2 – Click on “EDIT” button.
3 – Change Publish to Yes or No.
4 – Click on “UPDATE”.
Copy solution from existing solutions
You can see some default solutions also available in “Solution management”.

When you click on “COPY” button. It will create a new solution in “NEWLY ADDED SOLUTION” table. You can check newly added solution table after “solution copied successful” message.
Upload multiple solution from EXCEL sheet
Multiple solutions can be imported from Excel sheet. Excel file must follow below format:
1 – The excel sheet must contain columns – Name, Description, Type, Version, Category, Subcategory, Active, Solution URL, Facility
2 – File must be an XLS or XLSX

3 – Select File and click on UPLOAD button.
4 – The solutions will be added to table.
Note – Use this feature carefully as all the other solutions will be deleted and only specified in Excel sheet will remain.